- /
- /
- /
- /
Accuracy: Relative Accuracy, Absolute Accuracy, and Precision
Accuracy is a term much used but often misunderstood.
Common terms that are important with most measurement devices are ‘relative accuracy’, ‘absolute accuracy’, and ‘precision’. Sometimes these terms are used interchangeably, but they are not strictly the same. Here is a quick summary and then an example is given that might help.
Terms
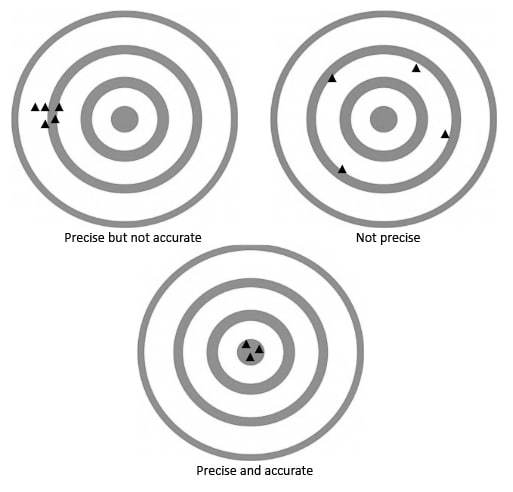
Precision: Precision is how close multiple measurements are to each other. Precise measurements are both repeatable and reproducible.
Accuracy: Accuracy refers to the agreement of a measured value to a standard or ‘true’ value.
Relative Accuracy: Relative Accuracy is how close a measured value is to a standard value on relative terms. In other words, independent of scale and translation.
Absolute Accuracy: Absolute accuracy is how close a measured value is to a know absolute true value. Usually provided in known and agreed-on units such as meters, cm, mm, inches, or feet.
Repeatable: Can one operator with one instrument get the same measurement over and over.
Reproducible: Can multiple operators, perhaps with multiple instruments, get the same measurement over and over.
Example
A classic example is using a dart board. The measurement process is the ‘throwing of darts’. The ‘measurement’ is where the dart lands on the board. The ‘true’ value is the center of the dart board.

Aside: sometimes you will see the dart board in the top-right being called “Accurate but not precise” (because the measurements are centered on the true center), but the ISO standard for the accuracy term says that measurements that are not precise cannot be accurate (usually because they are not easy to repeat or reproduce).
In a photogrammetric measurement, precision comes into play on the input (the photographic marking), and the output. How well a manual or automatic mark is done on a photograph is what we consider our input precision. Without good marking precision, it is hard to produce accurate output but there is an averaging effect. If a point is marked on many photographs, then lower precision marks can produce higher accuracy output.
PhotoModeler computes the output precision of points by a method called ‘error propagation’. Given the input precision (defined in Preferences in image pixels), and the computed camera positions and light ray angles, the output precision (in X Y Z) is computed for each output point. These precisions can be found on the Point Table. This tells you how ‘tight’ PhotoModeler expects the result to be, but it is not an indication of absolute accuracy.
In photogrammetry, we often state relative accuracy like ‘1 part in 1000’. That means relative to the size of the object, the output point is accurate (to one sigma deviation / one standard deviation or 68% probability) at 1000th the size. I.e. a 1 m object would have points accurate to 1mm with 68% probability (to 2mm with 95% probability).
To convert this to absolute accuracy, the project needs a scale (photogrammetry projects do not have a scale by default – that is, there is no difference between modeling a toy car or a real car until a scale is applied). The accuracy of the scale and how it is applied will affect absolute accuracy. The final absolute accuracy of your photogrammetric project (in some real-world units like mm or inches) is dependent on the relative accuracy of the project and the accuracy of the scale and how it is applied. This article talks more about the factors that affect relative accuracy in a photogrammetry project.
For additional detail see the Wikipedia article on Accuracy and Precision.
