

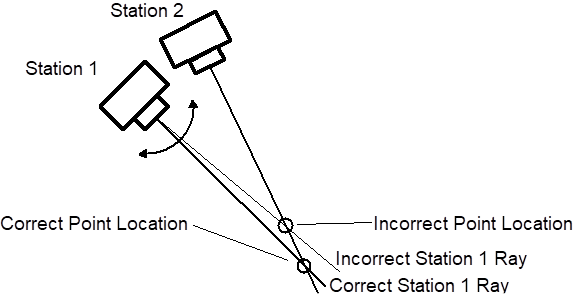
The process of measurement is never perfect. Measurement is instead the process of reducing and minimizing errors to maximize accuracy. If PhotoModeler has incorrect camera positions or orientations, it will generate an incorrect position for the 3D point. The figure below shows such a case. It depicts two cameras in which the orientation of Station 1 has been calculated incorrectly by a few degrees. PhotoModeler then incorrectly calculates the position of the 3D point because of the shifted light ray.
Point Location Error with Good Camera Positions
In the figure above and the figure below, Station 1 has the same position and the same angle error. On the other hand, in the figure below, Station 2 is close in angle to Station 1. The small error gets multiplied, and the resulting position of the 3D point is much farther off the mark.
The closer the angle between the light rays is to a right angle (90 degrees) the smaller any possible error will be. It is for this reason that the angle between the Camera Stations should be as close to a right angle as possible.
Point Location Error with Bad Camera Positions
Guideline 1: Take photographs with good angular separation (close to 90). Do not take all your photographs with similar points of view.
A few examples might make it easier to understand how to apply Guideline 1. The following sections show some of these examples.
Note: The photography requirements for a SmartPoints project are different than those for a regular points-based PhotoModeler project. See DSM Photo Requirements and SmartPoints Photo Requirements for more information on photography for PhotoModeler SmartMatch projects.