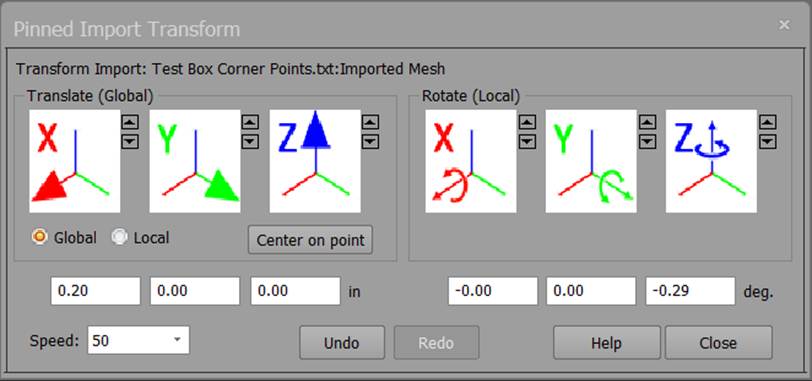

When there are no assigned points, there is full freedom to move and rotate the import.

On the dialog, from top to bottom, the information and controls on this dialog are:
• At the top, the name of the Import Object being pin transformed.
• The Translate group:
o Three translation controls for movement in X, Y, and Z
o Six nudge buttons for small movement in X, Y, and Z
o Three current translation value edits in global project units
o A radio button that controls if translation is being done in the project’s global coordinate system, or the import’s local coordinate system
o The ‘Center on point’ button that will translate the import to be centered on a selected 3D point (one-time action)
• The Rotate group:
o Three rotation controls for rotation around the X, Y, and Z axes
o Six nudge buttons for small rotations in X, Y, and Z
o Three current rotation value edits in global degrees
• The Speed drop down: the lower the number the finer control you have
• Undo/Redo buttons: Undo will undo the last movement. This can be repeated to step back in movements. Redo redoes the last movement that was undone.
• Help and Close buttons: to access the help file and close the dialog
The six white buttons with axes graphics are used to adjust the position and angle of the import with real-time feedback in the 3D View and projections on photos. To use, place the cursor over the button, left mouse click down on the button, hold, and drag the mouse away (in any direction). Release the mouse button to end the action.
Use the nudge buttons to the upper right of each big axis button to move or rotate on that axis by just a small amount.
The dragging action and nudge amount is controlled also by the Speed drop down and acceleration. The smaller the speed value, the more the mouse must be moved to get the same amount of change in one of the parameters. If you are zoomed into the photo and are doing fine adjustments, you can lower the speed value (to 1 – the slowest and finest control). There is also a built-in acceleration such that if you move the mouse very quickly the speed is temporarily increased to make some movements easier. These ratios of mouse to movements amount, and the acceleration control are defined by some hidden preference/ini values (contact support for more information).
You can also enter values directly into the translate and rotation edits. The translations are in project units and the rotations in degrees. Note that rotations are applied in order X, Y and then Z. Also note that while the rotations are done in a local coordinate system and the translation can be done globally or locally (see below), the six edit boxes show only global values (ie. in the coordinate system of the project and not the imported object). If you enter 0,0,0 and 0,0,0 in the six edit controls you will put the import back in its position and orientation when it was first imported.
The rotations are always local (i.e. you are rotating about the axes as displayed on the import), and translation can be global (i.e. you are moving along the axes of the project coordinate system) or can be local (i.e. you are moving along the axes of the axes as displayed on the import).