

A good method for taking photographs in many situations that covers many of the guidelines is the concept of “rings”. Remembering this concept of ‘photograph rings’ is a good way to cover most of the photography guidelines without having to remember them all.
Photographing an object using "rings" is quite easy:
Set up the first ring: Stand such that all of the object(s) being measured can be seen in the viewfinder of your Camera and it fills most of the viewfinder. Take a picture. Step around the object as if a string ties the Camera to the center of the object and the string always stays tight. Take many photos as you step around:
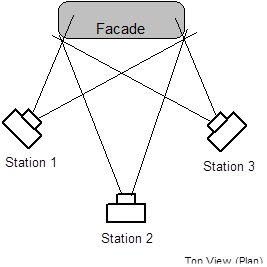
Top View of Camera Positions in a Ring around Object
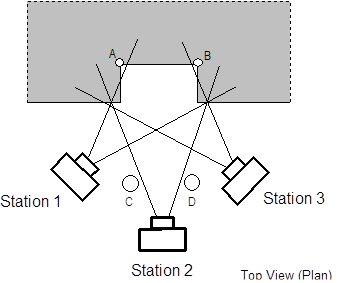
Set up other rings: Stand closer to the object now so a bit less of the object shows up. You might then want to center around an important part of the object. Take the photos.
Set up height rings: Raise the camera so it points down at the object more and repeat the previous set of rings. Also lower the camera so it points up and repeat the rings. Take the photos.
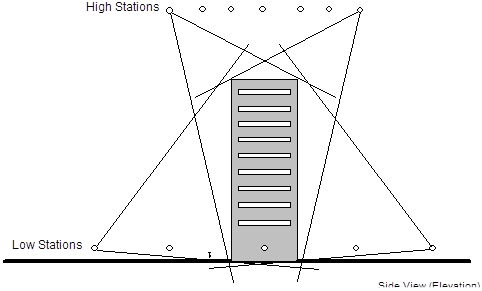
Side View of Camera Positions in a two Rings at different heights
Set up an overall view ring: Stand even farther away from the object to cover the object under consideration and some of the surrounding area. Step around this larger ring taking photographs.
This ring method looks like it uses many photographs. You do not have to take all the photographs shown here but instead use it as a guide. Also taking more photographs than you plan to use in your PhotoModeler project is good because photographs tend to be inexpensive and going back to the object or the site tends to be expensive or impossible. You never know when you might need something in one of those other photographs!
If possible take one or more photos covering the whole object or scene or as much of it as possible (i.e. from above). This can help ‘tie’ together the sides of the object or scene as a few key points from all sides can be marked and referenced in these overview photos.
Not all scenes or objects lend themselves to a pure "ring" method. Try modifying it to meet your needs, remembering to vary the angles, vary the distance and vary the height.