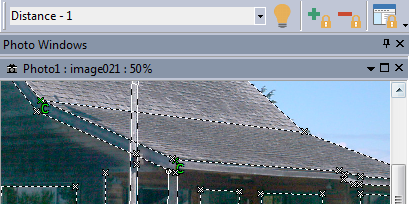


The Constraint Tool Bar appears when you enter Constraint Mode. This tool bar is used to add and remove objects from Constraints.
This tool bar has six controls, from left to right:
• the current constraint drop down list,
• the active constraint status icon,
• the add (+) and remove (-) objects buttons,
• the Constraint Dialog button.
Current Constraint Drop down list: All Constraints, whether active or in-active, that are part of the current project will be available in this drop down list. To view or modify the objects in a Constraint you first select the user-named Constraint in this list. The Constraint, called "Distance - 1" has been selected above. This drop down list also contains an entry called "All Constraints" which highlights all constrained objects on open views.
Active Constraint Status Icon: Once a Constraint has been selected in the drop-down, the icon will appear in one of three states. If the green check mark is visible, the selected Constraint is valid and "active". If it has a red ‘x’, Constraint does not have sufficient objects to be valid and is "inactive". If the icon is gray without an ‘x’ or a check mark, the Constraint has sufficient objects but the user has turned the Constraint off.
Add/Remove objects buttons: As soon as a Constraint is selected in the drop list, all objects that are part of the Constraint will be highlighted in open Photograph and 3D View Windows. Points will have a green "C" tag and Lines, Edges and Surfaces will have their background drawn green. Note that the default Constraint color can be modified in the Preferences Dialog.
To add an object to a Constraint, you first select the Constraint in the drop list, select the object(s) in the views (photo, tables or 3D), and press the "+" button. The newly added objects will immediately redraw with a Constraint highlight.
To remove an object from a Constraint, you first select the Constraint in the drop list, select the object(s) in the views (photo or 3D), and press the "-" button. The objects that were removed will immediately redraw with the Constraint highlight removed.
Open Constraints Dialog button: is a short cut to the Constraints Dialog where you can add, delete or modify constraints in a project.