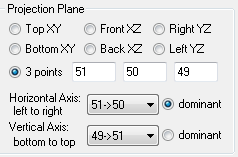

If the three point projection plane is chosen, the view direction and rotation is defined by the Horizontal and Vertical Axes controls as shown below:

When using the Horizontal and Vertical Axes controls it can be very handy to have a photograph or 3D Viewer open with point ID’s showing before opening this dialog. First you will decide which is to be the dominant axis (the axis that will line up perfectly with the edge of the image). The three points chosen do not need to be at a perfect 90 degrees to each other so this option can be useful.
Once the dominant axis is chosen, you will decide which points and which order will define that axis. The horizontal axis is defined by two points in order from left to right. Look at your points and decide which points will line up with the horizontal axis of the image and which order will give left to right ordering - then pick that from the choices given in the drop down selector. The vertical axis is defined by two points in order from bottom to top. Once the dominant axis is chosen, pick the other axis. Use the Preview as described below to ensure the correct axes (and order of points defining axes) have been chosen.