

Marking a Bent Tube is a lot like marking Curves, Edges or Cylinders. To mark a Bent Tube, enter the Bent Tube mode from the tool bar. The shape of the Bent Tube is traced (i.e. the silhouette of the shape is traced in multiple photos and those marks are referenced). What sets Bent Tube marking apart is that it involves marking just one of the tube’s edges and then defining the other edge by marking ‘widths marks’.
Choose photos on which to mark a Bent Tube that have camera angles that are close to 90 de.g. Use the 3D Viewer with camera stations visible to help decide what photos the tube should be marked and referenced on.
The Referencing Explorer can be used to help decide what photos to use for Bent Tube referencing - when a candidate pair of photos is open, mouse along the tube in the photo, and observe the reference helper line (see Reference Helper Lines) in the other photo; if the helper line is perpendicular to the tube, then the camera angle of the pair of photos is a good candidate:

The left image shows the source image where the cursor is located, while the right image shows the ‘destination’ photo showing the reference helper line intersecting the same tube at about a right angle.
If the Helper Line runs parallel or close to parallel to the tube (highlighted yellow), the photo is not good for marking that section of the Bent Tube:

The left image shows the source image where the cursor is located, while the right image shows the ‘destination’ photo showing the reference helper line running parallel to the same tube.
A Bent Tube mark consist of a series of Edge Points and Width Points, with connecting curves between them. Edge Points are added while marking the initial Bent Tube mark. Width Points are added after the initial tube mark is drawn. Edge and width points can be added, moved, or deleted to refine the Bent Tube mark’s shape and position (see Bent Tube Marking Adjustments).
Illustrated here is a tube edge being marked in a photo, using a series of edge points along one of the outer silhouette edges of the tube:

Once you reach the end of the tube you right click and select Finish and Draw Width:

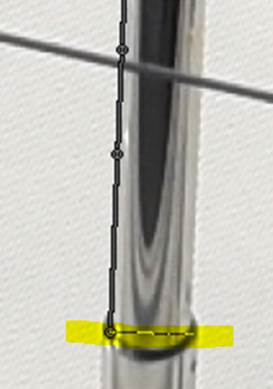
To draw the tube width, move the mouse to extend the width line to the opposite edge of the tube as shown here, as close as possible to the actual width of the opposite side of the tube (highlighted yellow):

Once the width is drawn, an Width Point will be placed, and then the opposite edge of the Bent Tube is filled in by PhotoModeler. The Bent Tube mark should follow the tube’s shape/silhouette reasonably closely. You may need to add additional widths along the tube to get the other edge to line up. We suggest marking first the width points as either end of the mark, and then one in the middle. Add others as needed. Right click on any existing edge mark and select ‘Add Width Mark’ to help fine tune the Bent Tube mark:

…and extend the new width mark to the proper opposite edge:
Addional width marks can be added wherever an existing Edge Point is located. Note that you can insert Edge Points anywhere along the main edge while in Bent Tube mode by using the right click menu. After the refinements, the Bent Tube mark should trace the shape of the Bent Tube on both sides in the photo closely.
You can mark bottom or top edge of a tube, and not all markings need to start at the same end. Also, partial Bent Tubes can be marked on a photo (e.g. the full tube isn’t visible on a photo, or part of the tube in a photo is obscured), and you can mark a Bent Tube in sections and reference them together, even two parts of the same tube on one photo (but for the tube to become 3D, it must be referenced on at least two photos).
For tubes with a sharp bend in a photo, we suggest marking the outside edge (the edge with the less sharp bend).
A straight tube that is parallel to image plane would need just one width. A straight tube with perspective (end are different distance from the camera) would typically need a width at each end. Tubes will need different number of widths based on their shape and perspective.